
How to Generate a DKIM Key for Your Domain in Google Workspace
This article explains how to generate a DKIM key for your domain in the Google Workspace (formerly G Suite) Admin console, publish the DKIM TXT record in DNS, and turn on DKIM signing for outgoing mail.
Applies To
Google Workspace / G Suite
Google Admin Console (admin.google.com)
Gmail
Domain DNS / TXT records
Prerequisites
You must be signed in with an account that has the Gmail Settings administrator privilege.
The domain must be verified and active in your Google Workspace account.
You must have access to the DNS settings at your domain provider.
After turning on Gmail for a domain, wait 24–72 hours before generating the DKIM key, otherwise the key generation may fail.
Resolution
1. Sign in to the Google Admin console at admin.google.com using an administrator account.
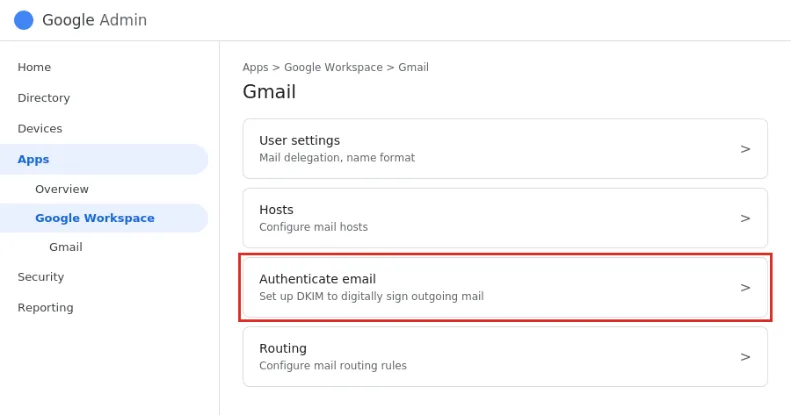
2. Go to Menu, then Apps, then Google Workspace, then Gmail, and click Authenticate email (highlighted below).
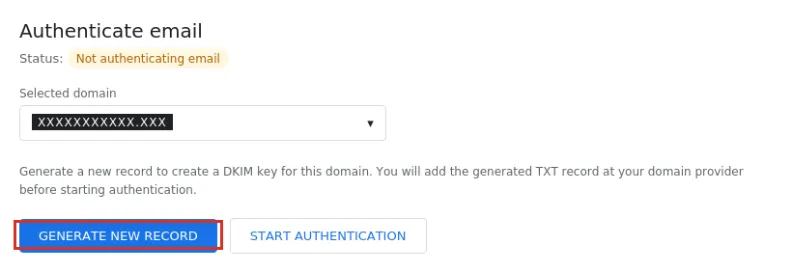
3. In the Selected domain menu, choose the domain you want to set up DKIM for, then click Generate new record.
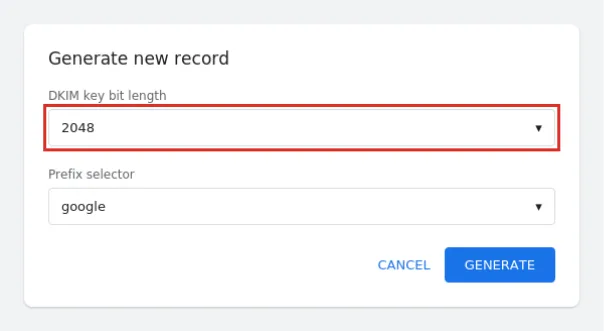
4. In the Generate new record box, select 2048 for the DKIM key bit length (use 1024 only if your domain provider does not support 2048-bit keys). Leave the prefix selector as google unless you need a different selector, then click Generate.
5. Google displays the DNS host name and the TXT record value. Copy both values. Do not click Start authentication yet.
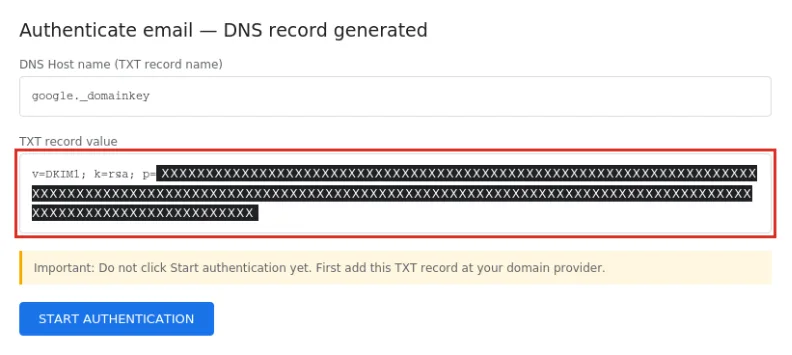
6. At your domain provider, add a new TXT record using the host name google._domainkey and paste the copied value (v=DKIM1; k=rsa; p=…) as the record value. Save the record.
7. Allow time for DNS propagation. This usually takes under an hour, but can take up to 48–72 hours.
8. Go to http://dnschecker.org/#TXT enter the respective hostname and search to confirm propagation.
9. Return to the Admin console, go back to Apps > Google Workspace > Gmail > Authenticate email, select the same domain, and click Start authentication.
10. Once Google validates the record, the status at the top of the page changes to “Authenticating email with DKIM”.
Note: The screenshots in this article are illustrative mockups created for this guide. The domain name and the DKIM public key value have been censored — your own console will display your actual domain and a unique key. Never share your full DKIM record publicly in support tickets or documentation.
Verification
Confirm the status on the Authenticate email page reads “Authenticating email with DKIM”. Then send a test email from the domain to a Gmail address, open the message, click the three-dot menu and select Show original. Under Authentication-Results, DKIM should show as PASS with your domain listed as the signer.
Troubleshooting
If Start authentication fails, wait 10–30 minutes for DNS propagation and try again.
If key generation returns an error, confirm that Gmail has been active on the domain for at least 24–72 hours.
Verify the TXT record was added with the correct host name (google._domainkey) and that no extra spaces or line breaks were introduced when pasting the value.
Some DNS providers require the value to be split into multiple quoted strings for long 2048-bit keys — check your provider's documentation if the record is rejected.
The Admin console may continue showing “You must update the DNS records for this domain” for up to 48 hours. If the record was added correctly, this message can be ignored.
Set up DKIM separately for each domain and for any third-party sending services (e.g. Mailchimp, SendGrid), as each requires its own key.
- domain