- When you connect to a remote computer (either a Windows client or Windows Server) through the Remote Desktop connection, the Remote Desktop feature on your computer “hears” the connection through a listening port.
- Microsoft uses the standard port 3389 for all remote connections which is a known fact. Many times, hackers use the 3389 listening port to connect to remote systems and use a system of automated password guessing to gain access to it. Such attacks are called brute force.
- Undoubtedly, this is a major security vulnerability that can put your remote system at risk.
- To overcome this vulnerability, many administrators choose to change the RDP port number from 3389 to any other free port, making it more difficult for hackers to identify the listening port.
Here is a step-by-step guide on how you can change the port number using the Windows Registry:
- Log in to the Windows server with an account that has administrative privileges.
- Open the Registry Editor by typing “regedit” in the Start menu search box and selecting “Registry Editor” from the results.
- In the Registry Editor, navigate to the following key: HKEY_LOCAL_MACHINE\System\CurrentControlSet\Control\Terminal Server\WinStations\RDP-Tcp\PortNumber
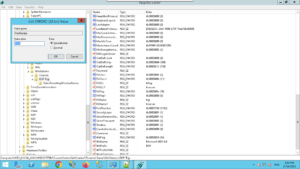
- Double-click on the “PortNumber” entry and change the value to the new port number you want to use for RDP in a decimal value.
- Click “OK” to save the changes and close the Registry Editor.
To allow an RDP port on the Windows Server firewall, you can follow these steps:
- Open the “Windows Defender Firewall with Advanced Security” app by typing “Windows Defender Firewall” in the Start menu search box and selecting “Windows Defender Firewall with Advanced Security” from the results.
- In the left pane of the app, click “Inbound Rules.”
- In the right pane, click “New Rule.”
- In the “New Inbound Rule Wizard,” select “Port” and click “Next.”
- Select “TCP” and enter the new RDP port number you specified in the previous step. Click “Next.”
- Select “Allow the connection” and click “Next.”
- Choose which network location types you want to apply the rule to and click “Next.”
- Give the rule a name and description (optional) and click “Finish.”
Restart the Remote Desktop Services or reboot the server to apply the changes.