A protection plan can be applied to multiple machines at the time of its creation, or later. When you create a plan, the system checks the operating system and the device type (for example, workstation, virtual machine, etc.) and shows only those plan modules that are applicable to your devices.
A protection plan can be created in two ways:
- In the Devices section – when you select the device or devices to be protected and then create a plan for them.
- In the Plans section – when you create a plan and then select the machines to be applied to.
Let’s consider the first way.
To create the first protection plan
- In the Cyber Protect web console, go to Devices > All Devices.
- Select the machines that you want to protect.
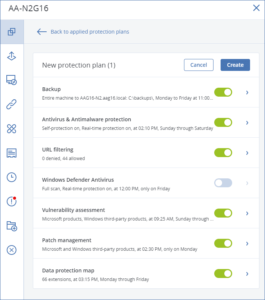
- Click Protect, and then click Create Plan. You will see the protection plan with the default settings.
- To modify the protection plan name, click on the pencil icon next to the name.
- To enable or disable a protection plan module, click the switch next to the module name.
- To configure the module parameters, click the corresponding section of the protection plan.
- When ready, click Create.
A. Selecting data to back up
Selecting the entire machine:
- A backup of an entire machine is a backup of all its non-removable disks.
- To configure such a backup, in What to back up, select Entire machine.
Selecting disks/volumes:
- A disk-level backup contains a copy of a disk or a volume in a packaged form. You can recover individual disks, volumes, or files from a disk-level backup. A backup of an entire machine is a backup of all its non-removable disks.
- In What to back up, select Disks/volumes.
- Click Items to back up.
- In Select items for backup, select Using policy rules.
- The policy rules will be applied to all of the machines included in the protection plan. If no data meeting at least one of the rules is found on a machine when the backup starts, the backup will fail on that machine.
- Click Done.
Selecting files/folders:
File-level backup is available for physical machines and virtual machines backed up by an agent installed in the guest system. A file-level backup is not sufficient for the recovery of the operating system. Choose file backup if you plan to protect only certain data (the current project, for example). This will reduce the backup size, thus saving storage space.
- In What to back up, select Files/folders.
- Click Items to back up.
- In Select items for backup, select Using policy rules.
- Select any of the predefined rules, type your own rules, or combine both. The policy rules will be applied to all of the machines included in the protection plan. If no data meeting at least one of the rules is found on a machine when the backup starts, the backup will fail on that machine.
- Click Done.
B. Retention rules
- Click How long to keep.
- In Cleanup, choose one of the following:
- By backup age: (default)Specify how long to keep backups created by the protection plan. By default, the retention rules are specified for each backup set separately. If you want to use a single rule for all backups, click Switch to a single rule for all backup sets.
- By the number of backups: Specify the maximum number of backups to keep.
- By total size of backups: Specify the maximum total size of backups to keep. This setting is not available with the Always incremental (single-file) backup scheme, or when backing up to an SFTP server or a tape device.
- Keep backups indefinitely
3. Select when to start the cleanup:
- After backup (default): The retention rules will be applied after a new backup is created.
- Before backups: retention rules will be applied before a new backup is created. This setting is not available when backing up Microsoft SQL Server clusters or Microsoft Exchange Server clusters.